
Sound Effects Library and Music found HERE.
Browse the tabs below for sound tutorials . . .
- Audio Planning Guide
- Recording Studio Pro Tools Setup
- MixPre 6 Basics
- MixPre Noise Assist
- QU-16 Digital Mixer
- Sync’ing Audio to Picture
- Avid Omni setup (Recording Studio & Edit Suite 7)
- Edit Suite 7 Audio Playback Guide
- Post-Production Sound Tutorials
- Sounds of Mics
- Roland R-26
- Film Mics Workshop
- Wireless Lav. Mics
- Tascam DR-60D
- DCP Audio
- Copying Project Files
- Foley Recording
- How loud should I mix?
- Audio Export Standards 2022
Recording Studio – Basic Recording
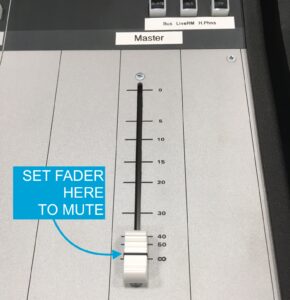
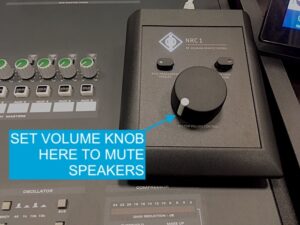
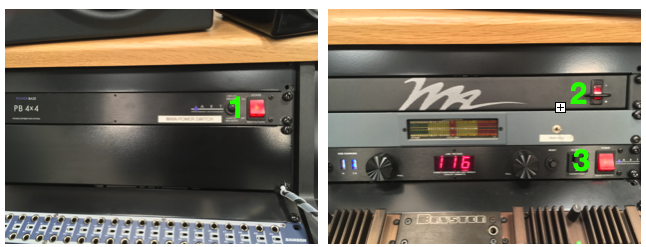
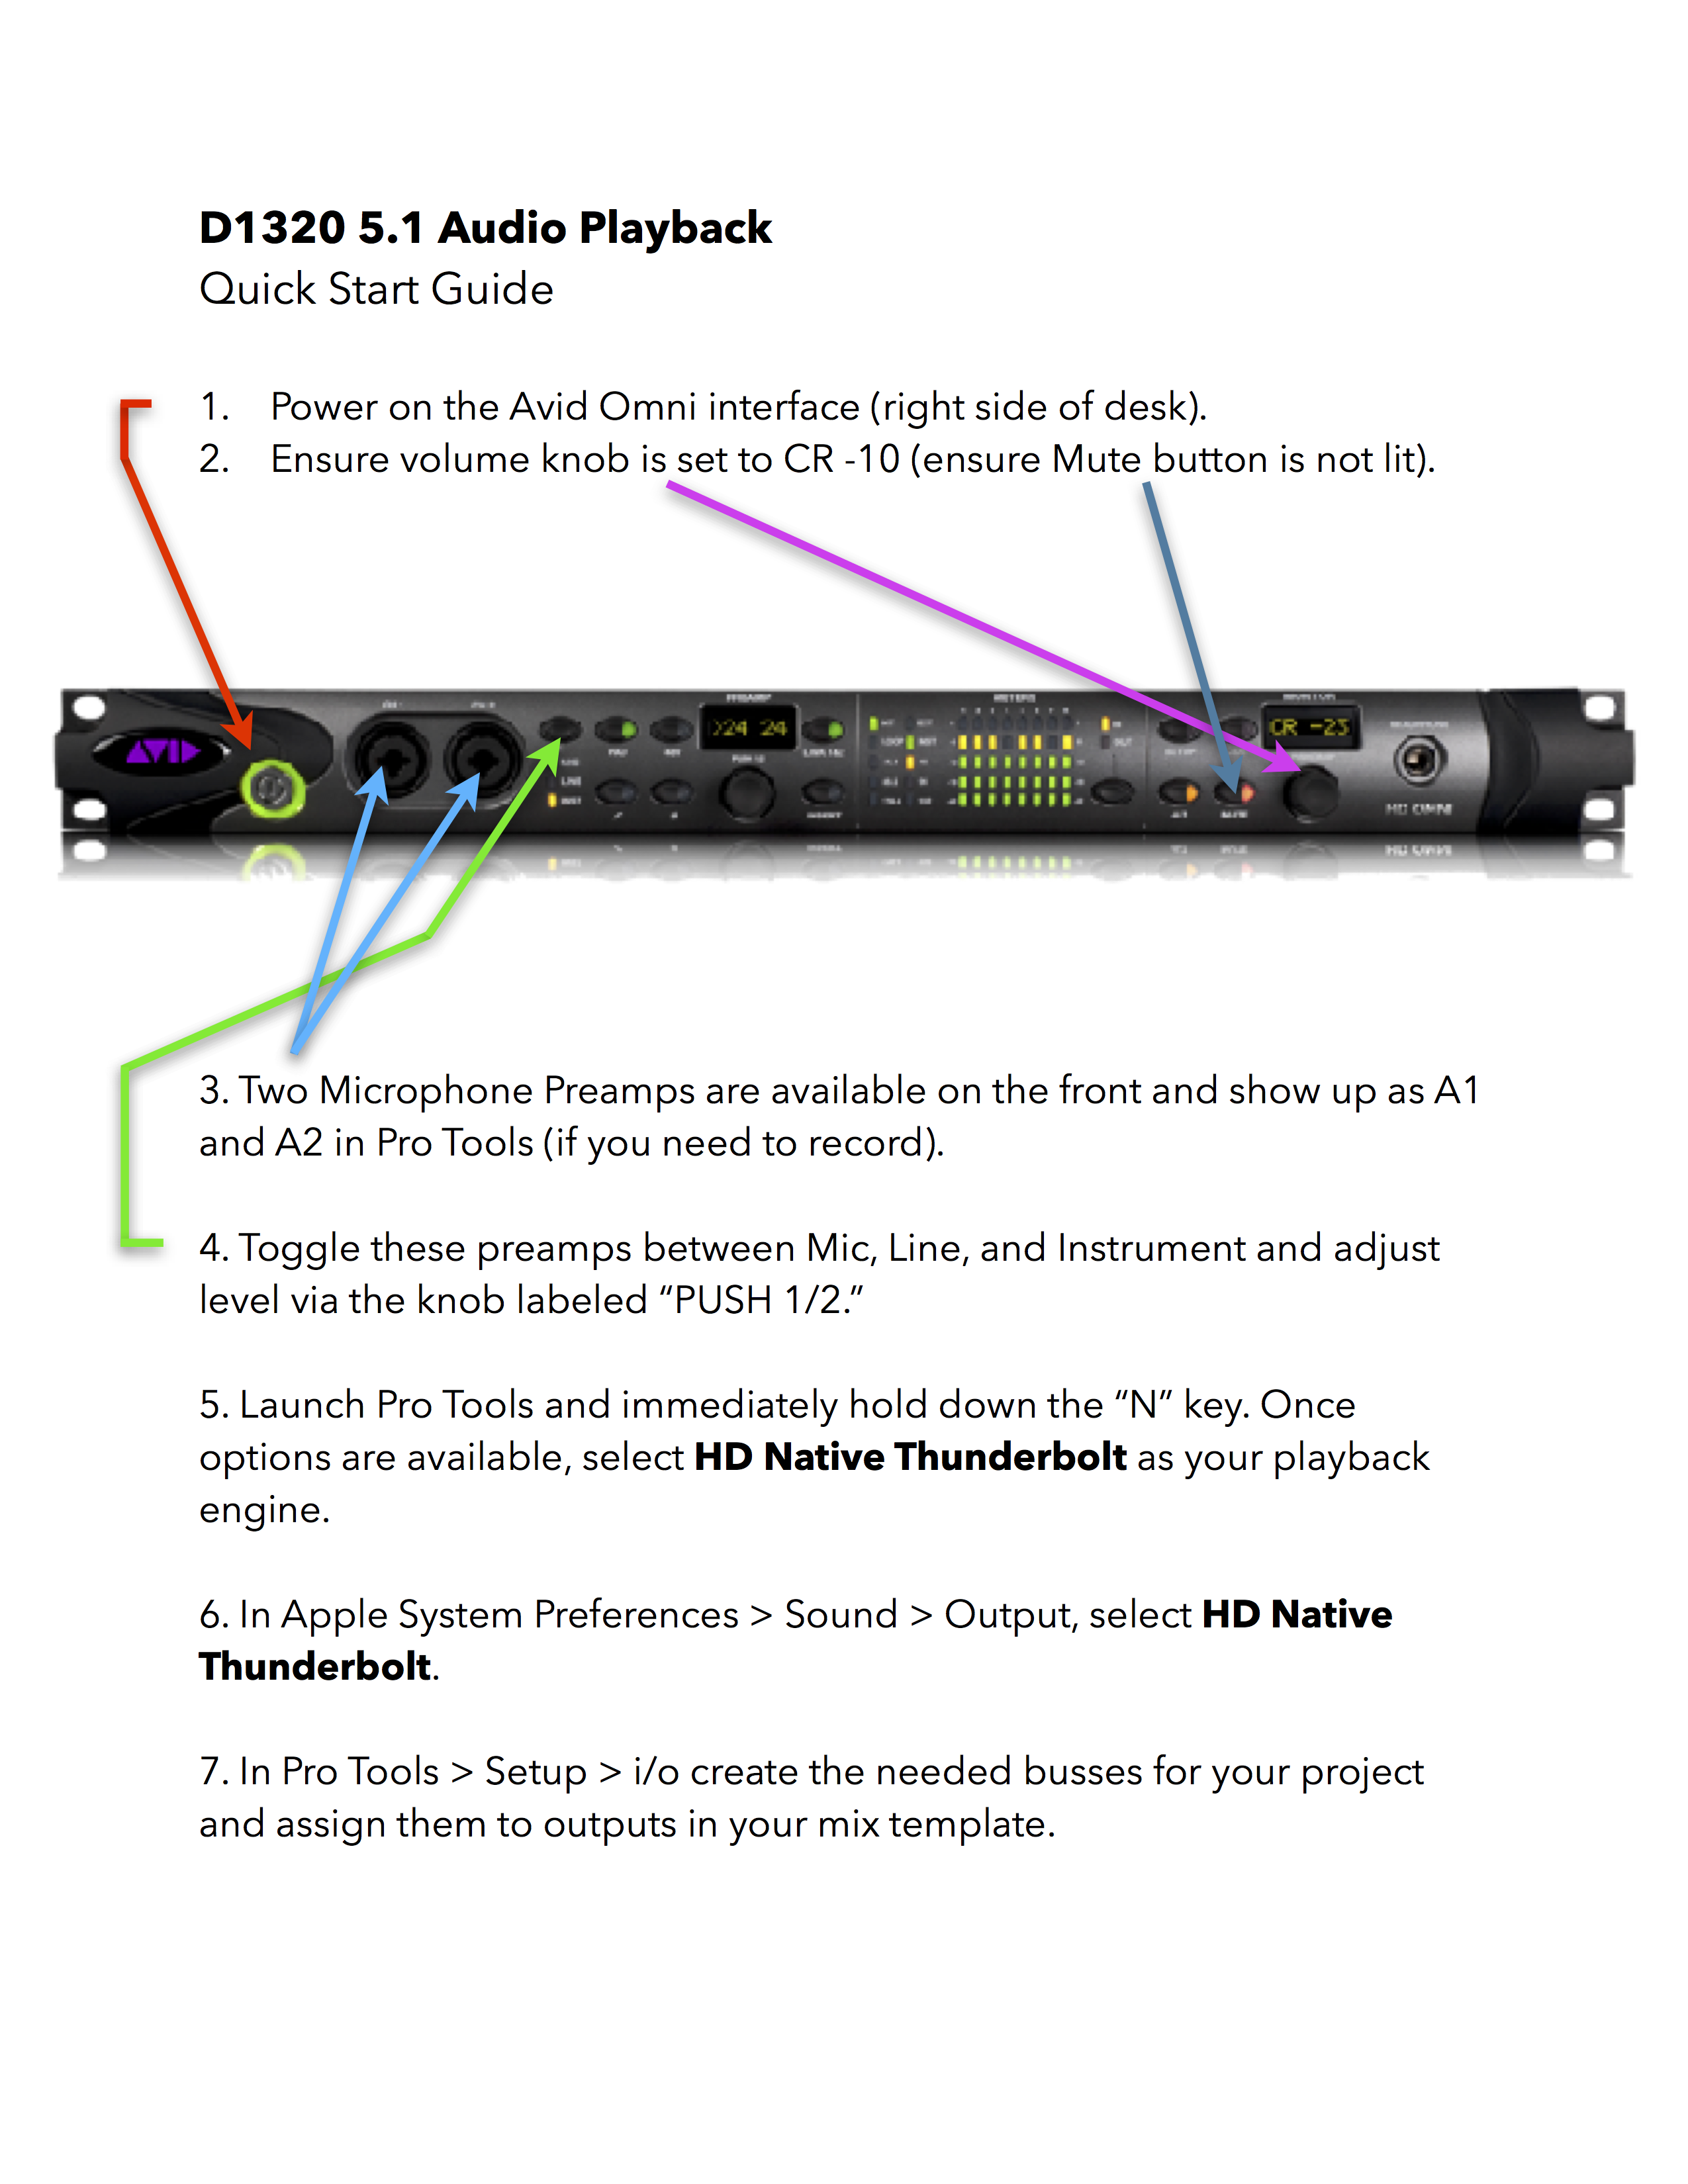
1) Ensure Speakers and Master Fader are set to their OFF positions. If just monitoring audio, increase speaker volume by rotating knob on the NRC 1 to the right.
2) In the order indicated in fig.2, switch ON the three power distributors located on the top racks (left and right side of desk). When finished working, switch them OFF in reverse order (3,2,1).
3) From the Mac’s Applications folder, launch Dante Virtual Soundcard and set as in fig. 3 (this should already running; if so, skip to step 4).
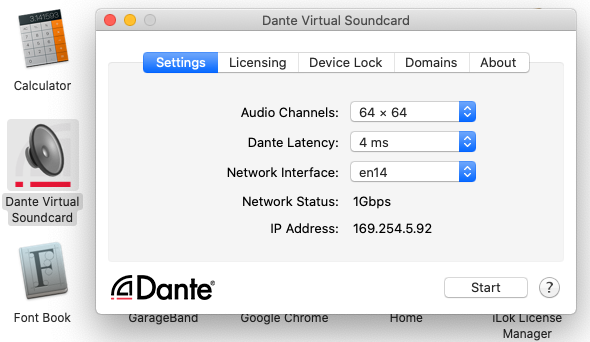
- Select Network Interface “en14.”
- Click Start – if already running, this button will appear as “Stop.”
4) Launch Pro Tools (in Dock, or Applications).
- Immediately hold down the “N” key while Pro Tools is loading. Or, once loaded, select Setup > Playback Engine.
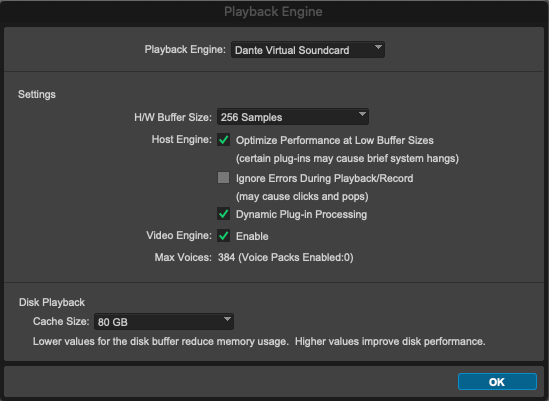
fig. 4 - Select Dante Virtual Soundcard as the Playback Engine.
- Set other options as in pic above and click OK.
- Now we need to create a new session file to record onto. Note: Unlike most editing software, in Pro Tools you likely won’t be creating a “Project” file. Sessions and Projects are different types of files. You should select Open Session, if you’ve got a previously saved Session. Project files in Pro Tools are called “Sessions,” while “Projects” are web-based collaborative files. Create a new file or open an existing (File > Create New or Open Session). Note: For new Sessions, set options as below, giving the session a unique name instead of “Untitled” . . .
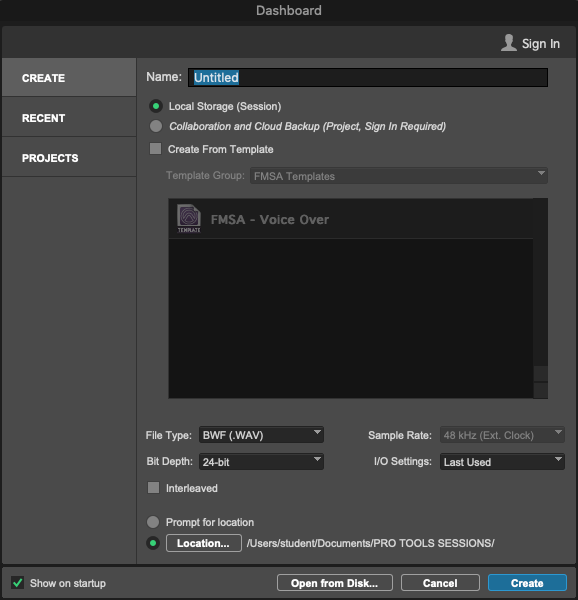
fig. 4a
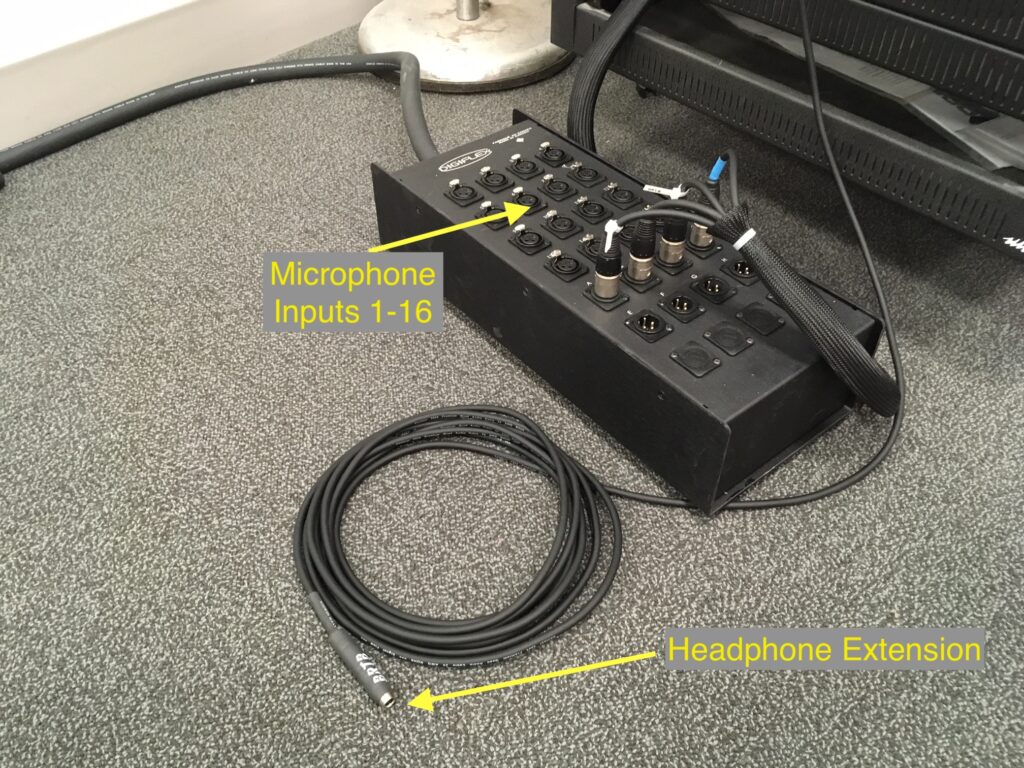
5) Connect a microphone to the black box in D-1322 (Live Room) by plugging into one of the 16 inputs shown in fig. 5. Usually, input #1 has our house mic plugged in with Phantom power engaged, in case you’ve forgotten to bring one. Note: On the rare occasion you may have brought in a ribbon mic, ensure you’ve powered off Phantom on that channel; not doing so could damage the microphone.
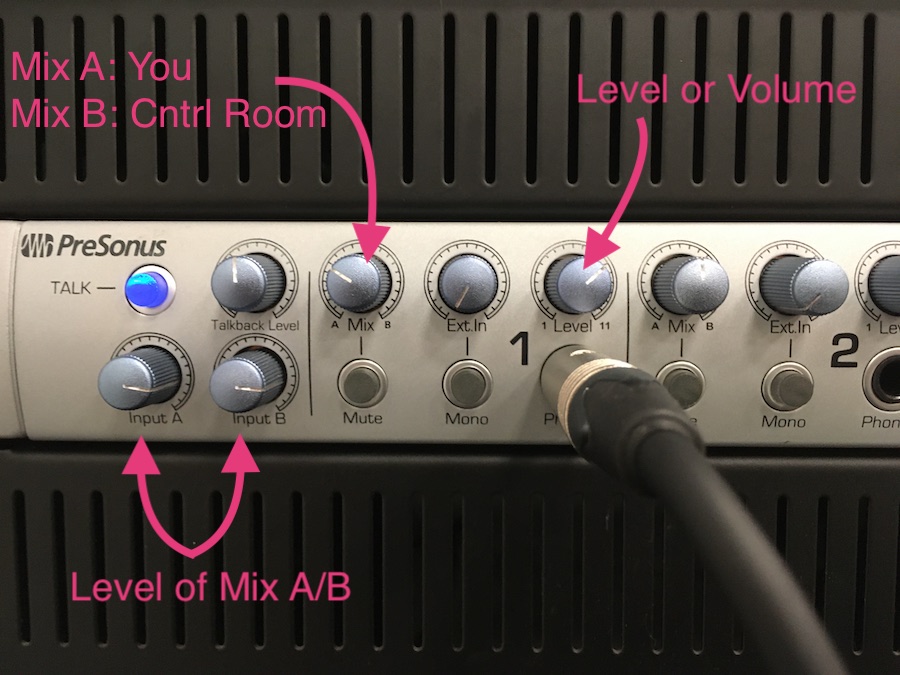
6) Back at the mixer, press the “Cut” button until lit red (button on the mixer channel you’re inputting mic signal into). For example, if you plugged a mic into input 1 on the black box, you’d be using channel 1 on the mixer.

- Lower the fader for that channel to the bottom.
fig. 6a - If using a condensor mic, press 48V, located at the top of the channel strip.
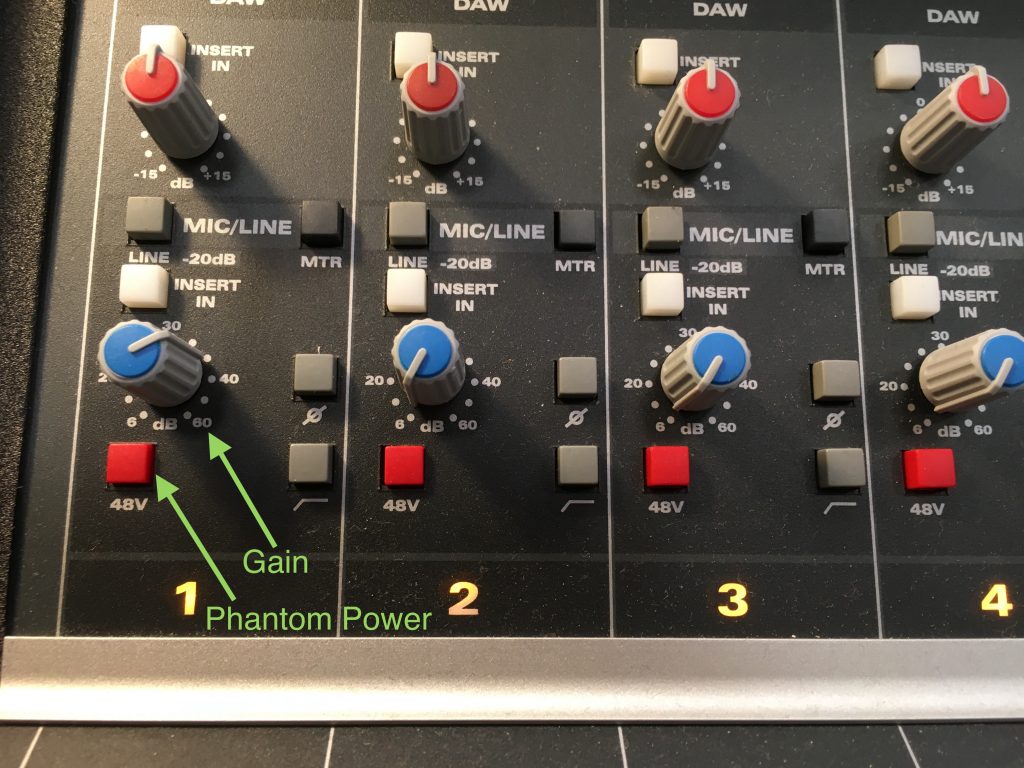
fig. 6b - Press “Cut” – this time ensuring its red light turns OFF.
- Raise white fader on that channel to the “0” mark.
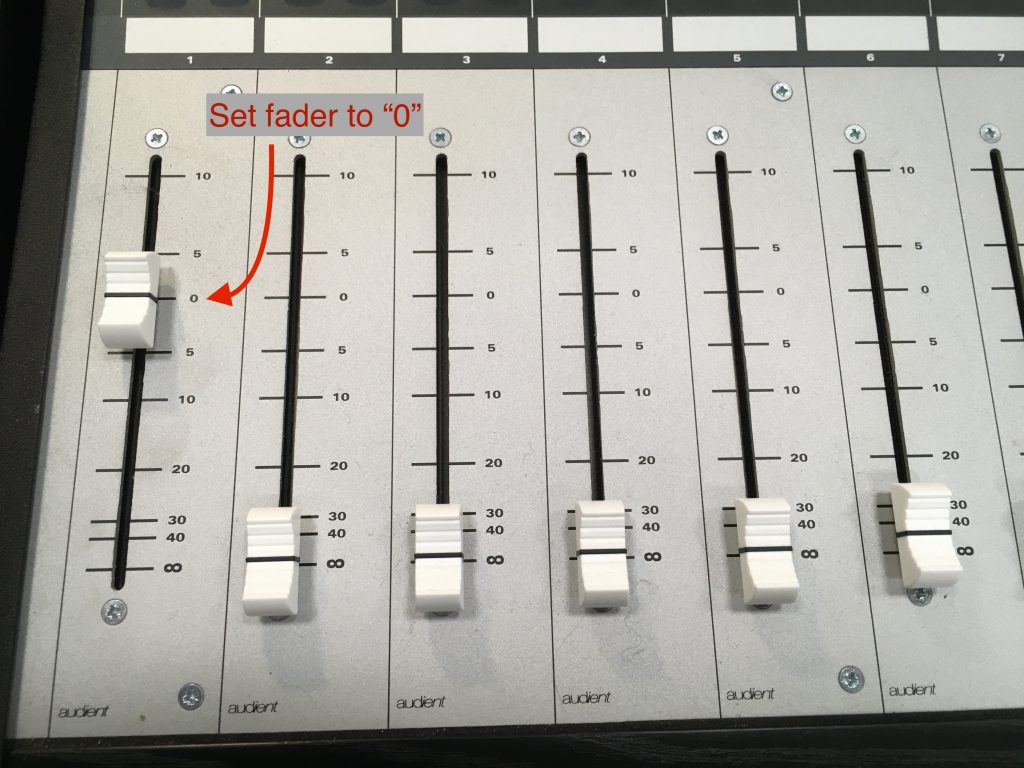
fig.6c - Raise Master Fader (fig. 1) to the “0” mark, at far right side of mixer. This fader should now be set all the way up to its top position.
- At the top of each channel strip, you can select which bus to send the signal from that channel. Default is channel 1 goes to bus 1, channel 2 goes to bus 2, . . . etc. Press a square, grey button down to select an appropriate bus. (Always return all busses to defaults when done)
- Ensure that the Mix button is pressed down, and the channel is on MIC, not DAW mode. Press the Flip switch to toggle between DAW and MIC. See fig. 6g.
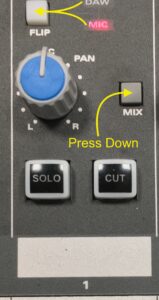
fig. 6g - Slowly increase gain (blue knob, top of channel strip – see fig. 6b) on your channel, while subject is speaking into the mic. Aim for an average level of 0 VU on the meter at the top of your channel strip.
Tip: Think of the topmost knob (gain knob) as your coarse adjustment of volume. The Long White fader (slider) at the bottom of the board is your fine adjustment. You can “ride” the faders while recording to make adjustments, if your source gets suddenly loud or quiet. Remember that the 0 mark on the mixer is your point of reference. Anything above that mark will add volume, anything below will subtract volume.
7) For main speakers, press the “A” button on the MTRX Studio panel (left side of desk). For smaller speakers, press the “B” button on the MTRX Studio panel and follow steps 7a+b.
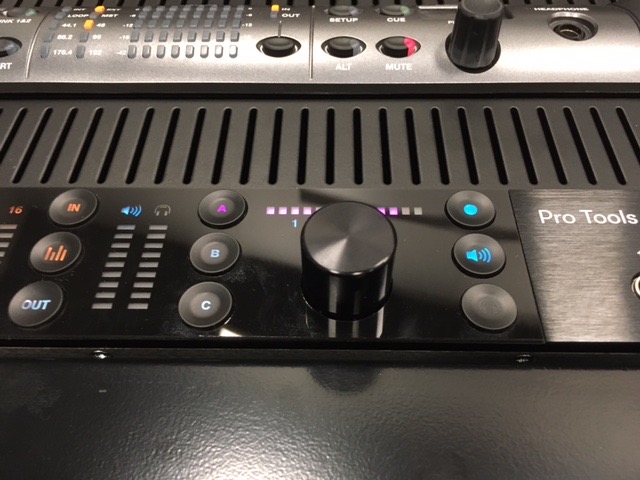
- Press the “ALT 2” button on the mixer (right side), also labelled “NS-10.”
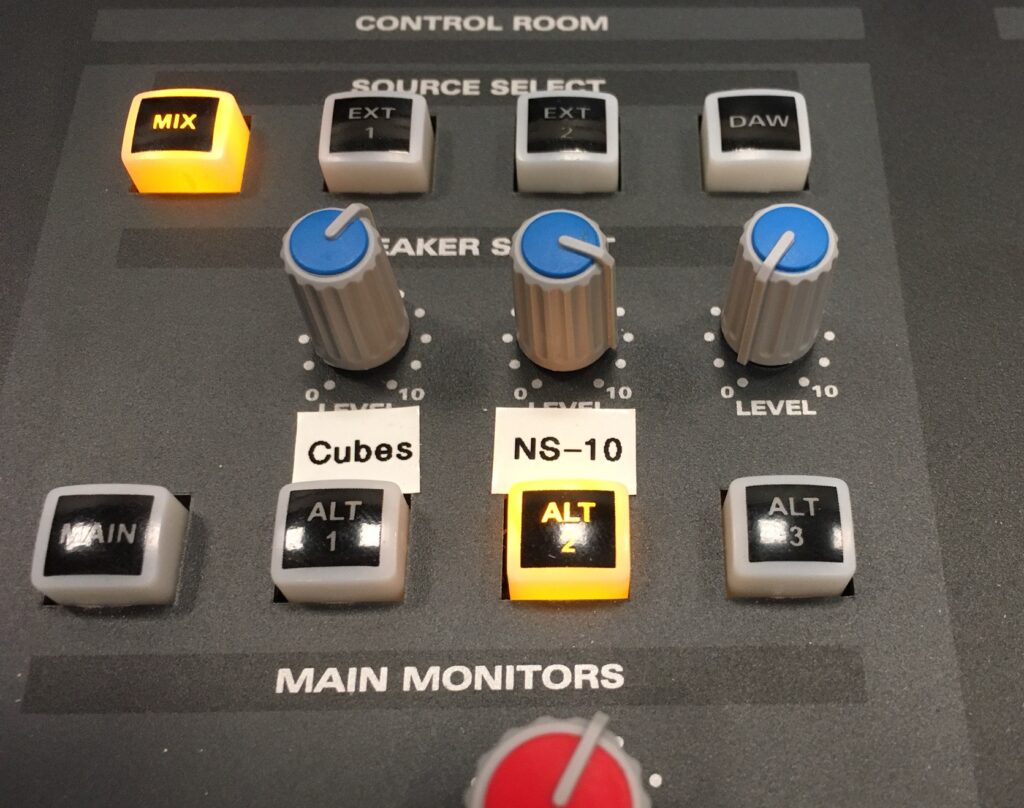
fig. 7a - While listening to your subject, set the desired speaker output level with blue knob above NS10 button.
8) Create a track(s) to record onto by going to the Track menu and selecting New Track. Make mono tracks for individual mics, or stereo tracks for pairs of microphones.

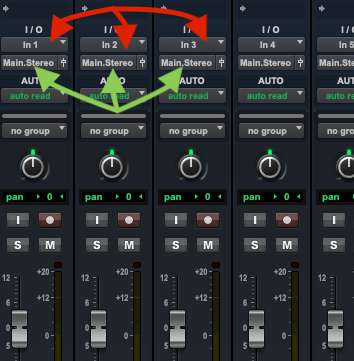
9) Set the input(s) of each track (red arrows) by matching the number with the physical inputs you plugged into on the black box, in the Live Room (D-1322). If you created multiple tracks, ensure that you set each input to its corresponding channel on the black box. For example, if you have three mics, plugged into the first three inputs (see fig. 9), you must set the tracks’ inputs to “In 1,” “In 2,” and “In 3.” On each track, match the inputs (red arrows) to those you chose on the black box in the Live Room.
For Output (green arrows), select Main.Stereo or Main(7.1) for surround playback.
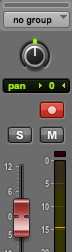
10) Set each track you’re recording to Mute before recording, by pressing the M button seen in fig. 10. Record Enable the track you want to record onto by clicking on the small Circle within a Square icon in either the Pro Tools Edit or Mix windows. Once clicked, the button will flash red, indicating that the track is now armed and ready for recording. If you want to record onto multiple tracks, just enable those additional tracks in the same way. Once you start rolling the recording, the buttons will light solid red instead of flashing. The S and M buttons below the Record Arm buttons are for Solo and Mute.

11) To actually start recording (fig. 11), you must first press the Record button (turns red), then the Play button (turns green). Once both buttons are pressed, they will light solid, instead of flashing, indicating that the transport is rolling and you are recording onto any enabled tracks. Press the Stop button to end recording. When you want to hear the tracks you recorded, Record-Disable them by clicking the Record Enable button on each track you recorded audio onto. Then un-mute each track you want to monitor. REMEMBER TO SAVE – OFTEN ! ! ! But Pro Tools makes automatic backups of your project file every 15 minutes, or less if you adjust that in settings.
12) If you wish to record to picture, you’ll need a video file rendered as one of the following:
- DNxHR (MOV)
- DNxHD (MOV)
- Apple ProRes (MOV)
- H.264 (MOV, MP4, M4V)
- H.265/HEVC (MOV, MP4)
- 24 fps – if using other frame rates, adjust in Pro Tools’ Setup > Session menu.
Tip: It’s best practice to use intra-frame codecs throughout the edit/mix/master process, as the timing stays consistent, unlike in inter-frame codecs. The best codec for our sessions here has been Apple ProRes 422 LT.
13) To import your video, go to File > Import > Video and navigate to your file.
- Select your video and click OK.
- Select a destination, usually “New Track.”
- Under the Location dropdown (fig. 13), choose where to place the video on the timeline – choose “Spot” to specify a timecode location, or simply choose “Session Start” and click OK. Choosing “Selection” will place the video at the insertion point.
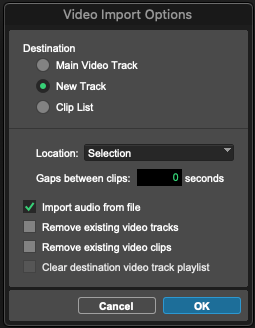
fig. 13
Tip: You’ll now have the video file placed at the head of the session, or at the timecode location you specified in the Spot dialog box. You can always slide the video around in the timeline to suit your needs by using the Hand tool and grabbing/sliding the clip around.
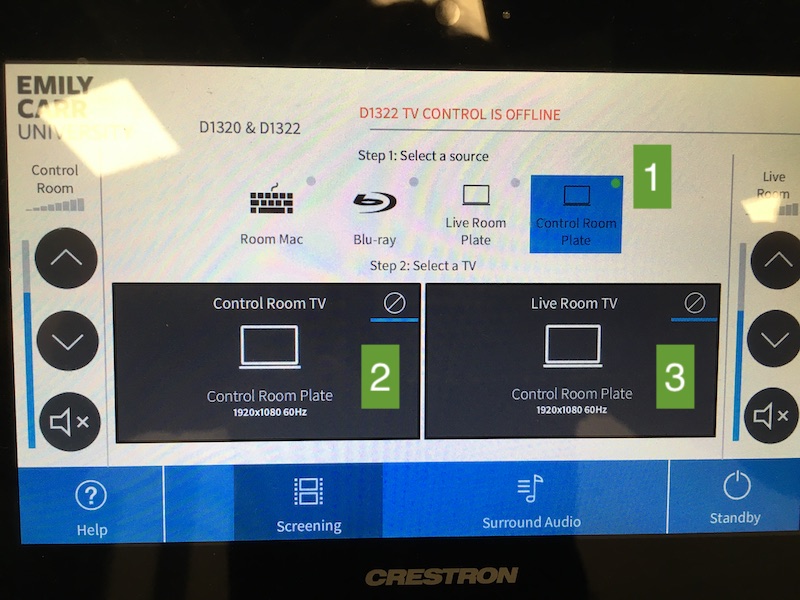
d. To view the video in the Live Room, touch the Crestron touchscreen in the 3 places shown in green on fig. 15. Touch in the order shown.
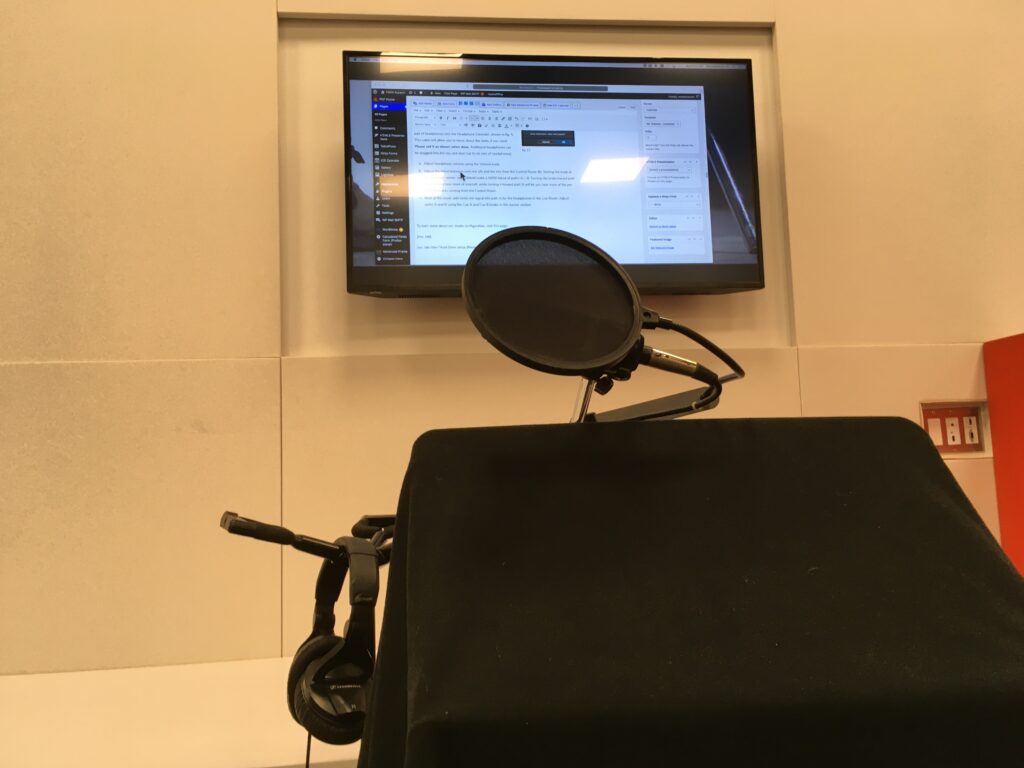
e. Now drag the video window in Pro Tools up to the top screen (60′” screen in Control Room) and it will be mirrored in the Live Room as shown in fig. 13c. As you can see, the screen is in front of the microphone and script stand, so recording voice or Foley to picture is easy.
14) While monitoring in the Control Room is usually done on speakers, in the Live Room you’ll be using headphones. Plug in a pair of headphones into the Headphone Extender, shown in fig. 5. This cable will allow you to move about the room, if you need. Please coil it as shown when done. Additional headphones can be plugged into the top rack item (up to six sets of headphones).

- Adjust headphone volume using the Level knob, shown in fig. 14.
- Adjust the blend between your mic (A) and the mix from the Control Room (B). Setting the knob at 12:00, or top-center, would blend make a 50/50 blend of paths A + B. Turning the knob toward path A will let you hear more of yourself, while turning it toward path B will let you hear more of the pre-recorded tracks coming from the Control Room.
- Back at the mixer, add some mic signal into path A for the headphones in the Live Room. Adjust paths A and B using the Cue A and Cue B knobs in the master section, shown in fig. 14b.
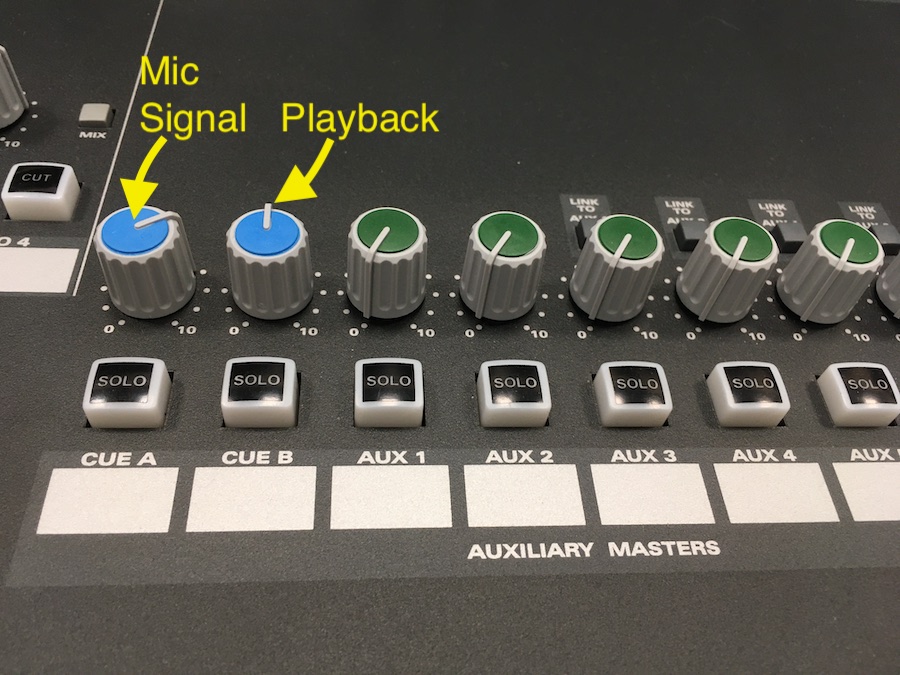
fig. 14b
To learn more about our studio configuration, visit this page.
Sync’ing Sound To Picture
![]()
Useful Lynda.com tutorials on post-production film sound
login via https://myec.ecuad.ca
Course: Pro Tools 12 Essential Training: 101 – 4hr 30min
https://www.lynda.com/Pro-Tools-tutorials/Pro-Tools-12-Essential-Training-101/533108-2.html?org=ecuad.ca
Course: Adobe Audition: Mixing a short film – 1hr
https://www.lynda.com/Audition-tutorials/Mixing-Short-Film-Audition/111779-2.html
Course: Pro Tools: Audio for Film and Video – 5hrs
https://www.lynda.com/Pro-Tools-9-training/Audio-for-Film-and-Video-with/77862-2.html?org=ecuad.ca
Tutorial: Learning iZotope RX 6 (De-noise and restoration for audio noise issues)
https://www.lynda.com/RX-tutorials/Learning-iZotope-RX-6/585215-2.html
Tutorial: Working with Foley – 1hr 20min
with Pro Tools: Mixing a Short Film
https://www.lynda.com/Media-Composer-tutorials/Working-Foley/111780/121764-4.html
PDF notes ECUAD’s Microphone collection and basic specs
What do Different Microphones Sound Like?
Ever wondered what the difference is in sound from mic to mic, but you don’t want to get bogged down with technical drawings, specs, and theory? Then grab a pair of headphones and check out this video to listen and compare for yourself . . .
Roland R26 recorder workshop– Check out this simple, touchscreen recorder; records up to 6 channels and sounds great! Just pause to actually read the slides…
Restricted Mics Workshop
Media Resources has a number of microphones which are restricted for use in FMSA courses. This workshop covers the basics of microphones, selection, polar patterns, etc.

Tascam DR-60D Audio Recorder
Tascam DR-60D workshopLCR for DCP
The new format for cinema playback is DCP and requires a specific audio format outlined in this LCR Mixing Tutorial
Moving Pro Tools Session Between Computers
If you’re working on Pro Tools at the school, chances are you don’t have enough time in any one edit room to complete the project.
Likely, and hopefully, you’re carrying around an external hard drive which will serve as a backup, and the new location of your session folder. If you don’t follow the procedure for copying the session, Pro Tools will get confused at the new computer and be unable to find some or all of your files. For example, if you just try copying the files manually (dragging your old session folder onto your external drive), the allocation of your files will get corrupted and things won’t work properly. The solution is simple: in Pro Tools, go to the File menu and select “Save Copy In . . .”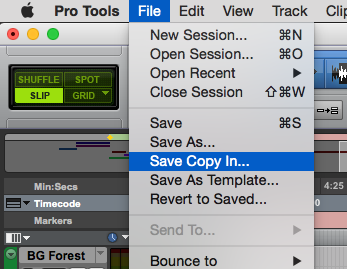
You’ll see the following window:
 Ensure that you’ve checked the appropriate tick boxes in this window. Under Items To Copy, select “Audio Files” and “Movie/Video Files.” Click “OK” and Pro Tools will create a new session folder containing everything in your session and save it to your external hard drive. Now use this newly created session on a different computer.
This is the best video I’ve found on the subject of performing and recording Foley for building up a soundtrack. It’s neat that we’re using the very same mixer as they are!
Foley Workshop
Background – What is Foley?
- Named after Jack Donovan Foley
- Act of recording sounds to simulate live-action for radio and film
- 1920’s radio play broadcasts were enhanced by his self-made SFX
- Adapted for film and still used today
Types of Foley
- Footsteps
- Movement/body/clothing
- Props (doors, costume FX [like armour], weapons, etc.)
Step by Step Setup
1. Watching the final cut, and/or reading your script, write down all needed sound effects, thinking about the 3 main types of Foley. Note character names for specifics like footsteps and certain clothing they might be wearing.
2. From that list of sounds needed, source materials to create sounds from. Ex: Crackling bacon can be simulated with cellophane wrappers. Collect appropriate shoes for your characters’ footsteps (heels, leather, sneakers, etc.).
3. Connect microphones in the Live Room, activating those channels on the mixer in the Control Room (see Recording Studio Pro Tools Setup tutorial to get started).
4. Import your film into Pro Tools – See “Recording Studio Pro Tools Setup” on the http://fmsasupport.ecuad.ca/tutorials/sound/ page.
-
- File > Import > Video
- Place at Session Start
- Ensure proper frame rate sync – Setup > Session
5. Create tracks to record sounds onto
-
- – Choose Track > Create New Track (build several, as needed)
- – Label tracks appropriately (Ex: Foot_Janet)
6. Create 3 beeps for timing (or import from some source).
7. Either create pre-clips or region groups or highlight the to-be-recorded section and use Loop Record to iterate through multiple takes. Choose Options > Loop Record.
8. Ensure “Automatically Create New Playlist When Loop Recording” is enabled.
-
- – Choose Setup > Preferences
- – Click the Operation Tab
- – Tick the box next to “Automatically Create New Playlist”
This selection will allow Pro Tools to create a new clip for every “take” or loop you iterate through, saving each as a separate clip. You can combine/edit clips later to make a perfectly-suited-to-picture sound.
9. Record-Enable a track
– Click the enable button for the track onto which you want to record. Look for the circle-within-a-square icon.
10. Line up your 3 beeps to give the Foley artist a cue, placing the beeps clip exactly 4 seconds before the point at which you want to start the recording.
11. Make a selection in the timeline (including the beeps clip), then Press Record and Play to start rolling the recording. Once you’ve done enough loops or “takes,” press Stop.
12. Move on to the next track or sound effect, repeating the steps above. Remember to disable or un-arm the last track, and Record-Enable the next track to be recorded!
13. Once you’re done recording, edit your sounds by expanding the tracks’ views to Playlist view. In the Edit window, Click on Waveform, and select Playlist to show each loop as a rainbow of clips. You can combine clips as needed by making selections and clicking the up arrow (Promote) button, or simply select your favourite from the list.
14. Mix those Foley sounds in with your dialog, background ambience and music to put your soundtrack together. Balance the levels of each track to ensure dialog sits on the top of the mix, with SFX, Foley, Ambience and Music as supporting elements.
How loud should I mix?
The thread in the link below is a good read. It explains how complex sound mixing is when we start asking the question of how loud we should be mixing; or how quiet. It may raise more questions than answers, but is very informative and illustrates the minefield that is audio post-production. The two sections below show how to look at audio levels graphically. The first method uses a radar type display and shows level over time. This is a hidden gem within Adobe’s Audition. Click below for more info . . .
How to Read Audio Meters
Look in Adobe AuditionsEffects Rack under Special for the Loudness Radar Meter or Adobe Premiere’s Audio Track Mixer (FX Inserts) and under Special for the Loudness Radar Meter. The TC Electronic Loudness Radar meter is very helpful for achieving proper levels for your final sound mix. This style of meter shows a history of audio levels over the length of your program material and at a glance, one can easily see where in time the problems occurred. It’s a bit like an aircraft radar unit in that it displays time in a circle, volume as a radiant — loudest sounds appearing at the outermost edge of the circle. Anything that crosses the second circle from the outside will be crossing your determined threshold. For example, in the pic below, you can see I’ve selected -23 LKFS as my desired target for my finished mix. That means I want my average level to be sitting on that second circle. It can go above and below that, as long as the max True Peak is < -2 dBfs. 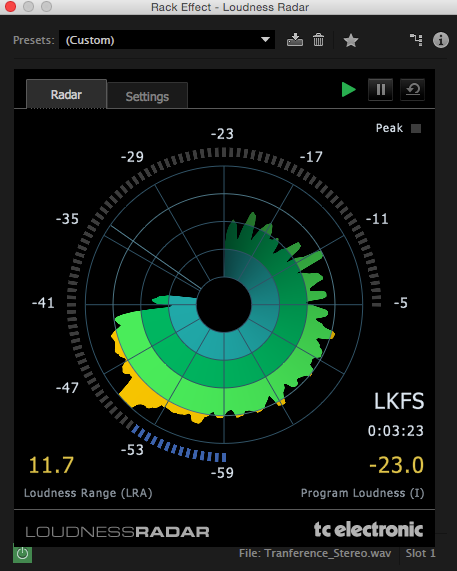
In this image, you can see the waveform of the same audio we looked at in the Radar view above, just expressed horizontally (the way most DAWs display it). This displays the peak audio level at any given moment, but does not display True Peak or Loudness Range. It is best used for editing purposes.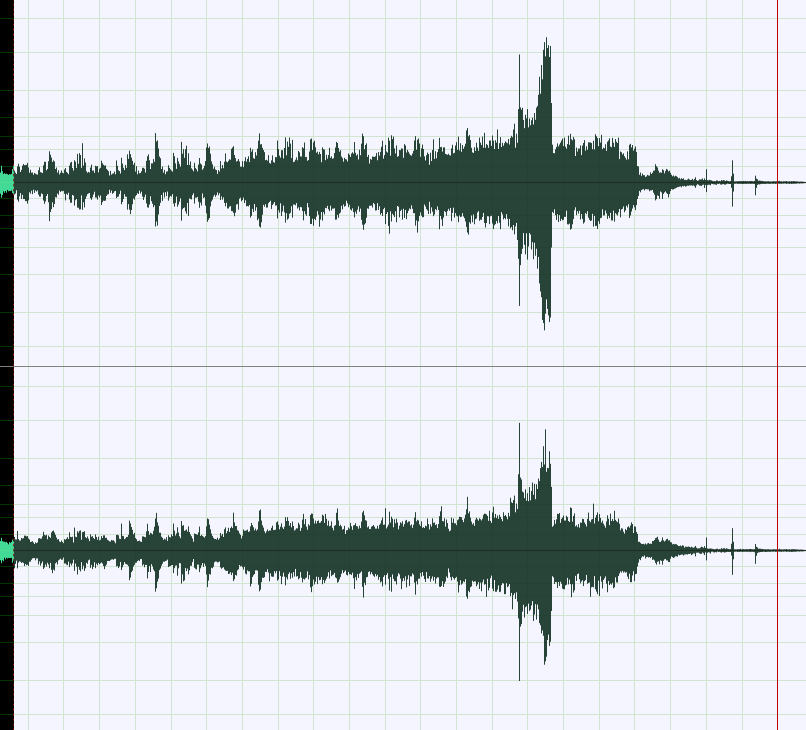
An ironic digital cloud hovers over the feature film audio industry. Many producers, directors, and studio executives are demanding that engineers mix movie sound tracks louder than ever before, even as theater owners are turning the volume down. Read the article here.
Please find below, this year’s deliverables for audio files.
*** Please note that your submission will be returned to you unprocessed if your files do not conform to the specifications outlined below. *** If you need help with your export, contact a technician.
- Audio exports should always be 48 kHz, 24 bit uncompressed WAV files.
- Audio levels must be mixed to the following guidelines:
- -24 LKFS (Program Loudness of Mix)
- Peaks (loudest sound) no higher than -2 dBTP
- Dialog normal (average talking) levels around -27 LKFS
- Dialog peaks (shouting) no higher than -10 dBFS
- QuickTime files must contain:
- 48 kHz, 24 bit uncompressed audio
- Stereo, LCR or up to 7.1 channels (according to your final mix)
- Students submitting DPX image sequences must also include either:
- A single stereo 48 kHz, 24 bit uncompressed .wav
OR
Multiple, discrete .wav files for LCR or 5.1 or 7.1 (Surround)
-
-
- Each discrete channel must be a mono, 48 kHz, 24 bit uncompressed .wav file
- Representing either 3 channels for LCR (L, C, R), or 6 channels for 5.1 (L, R, C, LFE, Ls, Rs), or 8 channels for 7.1 (L, R, C, LFE, Lss, Rss, Lrs, Rrs)
- Each channel must be clearly labelled according to its channel (doe_j_L.wav, doe_j_C.wav, doe_j_R.wav) noting the correct channel path name just before the .wav
-